
One of my students is turning 15 this weekend, so I thought it would be fun to bring some cupcakes to class. But I didn’t want to just do cupcakes, I wanted to do something epic with fillings and toppings and a lot of height.
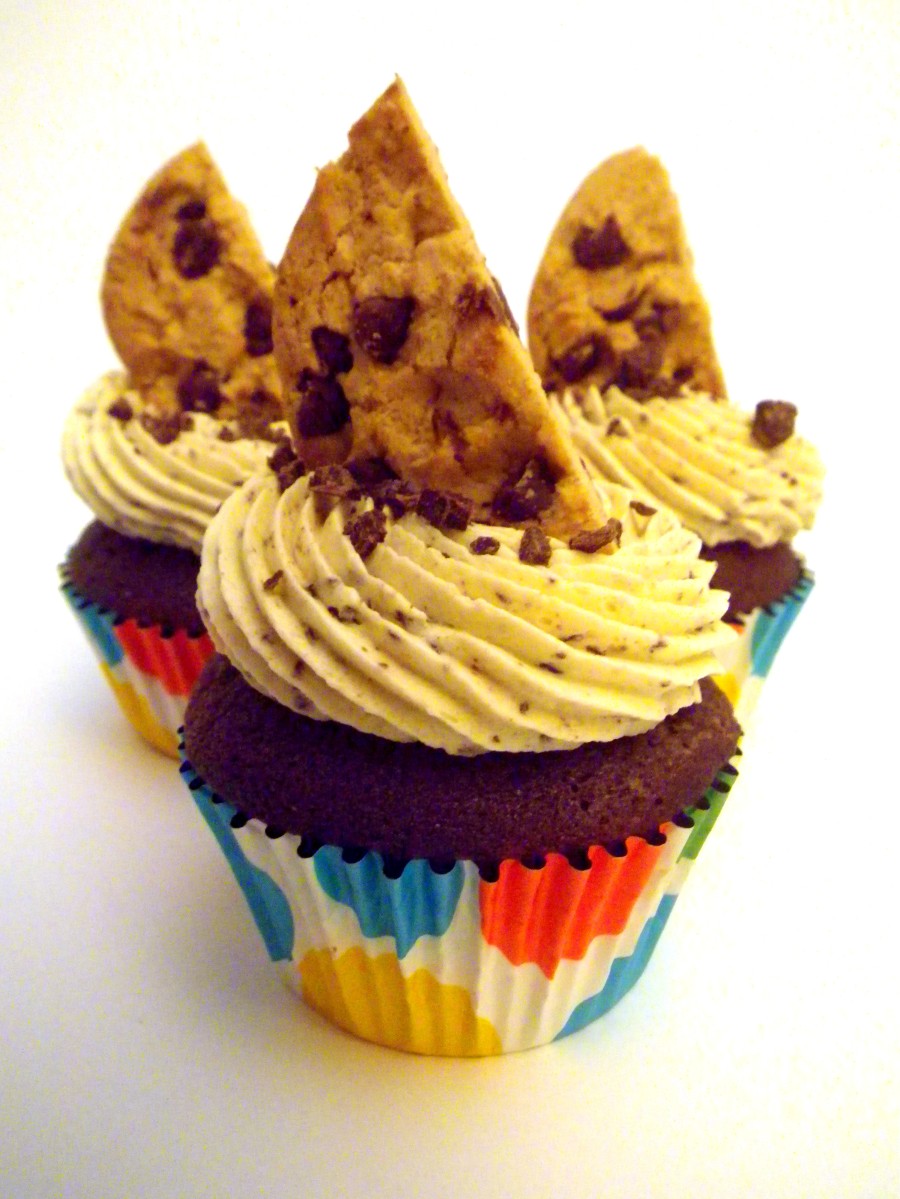
I started with a devil’s chocolate food cake, because chocolate is an amazing base for so many flavours (and really, who doesn’t love chocolate). I thought it would be fun to have two different flavour options for the top, so I made two separate sets of fillings, buttercreams, and toppings, starting with a chocolate chip cookie butter.
I bought some chocolate chip cookies at the corner store for this, but cookie butter does work well with homemade cookies (I would opt for a crunchy cookie rather than soft, it seems to break into crumbs a little better). I followed Gemma Stafford’s ratios for the cookie butter using a half-recipe, but swapped 18% cream for the evaporated milk. I tried to only mix until the cookie dough was a deep brown, but still had some little pieces of chocolate visible. I didn’t want to end up with a fully homogenous mixture in the end, because I like the look of the little chocolate bits peeking out.
Once my cupcakes were cool, I cored half of them with an apple corer and filled each one with a little cookie butter. To top, I made a chocolate chip cookie buttercream. I started by whipping 100g of butter, then gradually added in 190g of powdered sugar and 35g of brown sugar, followed by 1 tbsp of cream. Now, I normally also would add about 1/2 tsp of vanilla, but I completely forgot this time! I did end up adding a few extra splashes of cream as needed to get the consistency where I wanted it. This buttercream is adapted from my usual recipe (I follow Cupcake Jemma, as always). I found this works better when there isn’t too much brown sugar in it, as the brown sugar ends up a little gritty in the frosting. At this point I took my bowl out of my mixer and stirred in some chopped semi-sweet chocolate by hand (I don’t know exactly how much, somewhere around 1-1.5oz. I tend to eyeball and stop when I’m happy with how chocolatey it looks). The smaller the better for these chocolate pieces, as they can get stuck in a piping tip if you use a smaller tip.
I have a new jumbo open star tip (Wilton 6B) that I wanted to try out, so I piped on one big swirl. I found that this looked better when I held down for a second in the centre and made a nice big blob before I swirled around the cupcake. If I started the swirl too early, the icing was a little less tall and just didn’t look as nice.
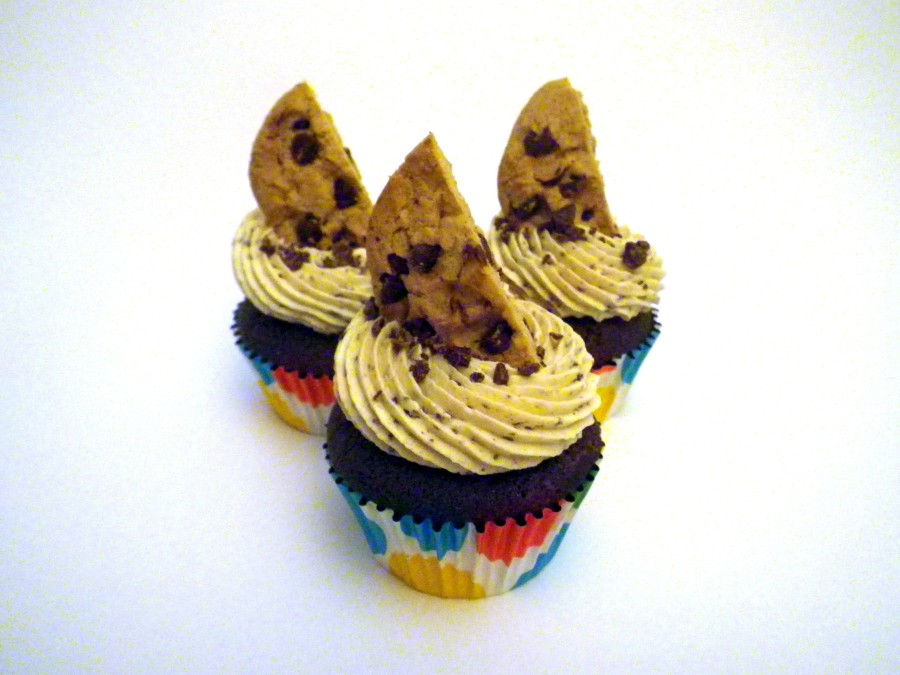
To finish off, I sprinkled with some remaining chocolate pieces. I cut my remaining cookies in half with a bread knife and pushed half a cookie into each cupcake, leaving the cookie at a slight angle.
Before I get onto my mint cupcakes, I just want to talk for a second about these cupcake liners. Look at how bright those are! My boyfriend’s mom got me these for Christmas, and they are foil-lined so the colour doesn’t fade during baking. I never really realized how much my liners lose their colour normally until I took these out of the oven. It was actually a super exciting moment. I will definitely keep an eye out for these foil-lined cupcake liners in future, they just add something lovely and bright to finish off a cupcake.
Moving on to the mint chocolate cupcakes! I actually meant for these to be fairly simple, but after putting so much onto the chocolate chip cupcakes I thought it would be entirely unfair of me to have one amazingly topped cupcake and one boring – albeit tasty – flavour option.
I had some chocolate left over after making my chocolate chip buttercream, so I made a chocolate ganache (3:1 ratio semi-sweet chocolate to 18% cream) to fill these cupcakes. I added a little peppermint extract to the ganache to give a hint of mint. I cored the remaining cupcakes and filled with this ganache, and as luck would have it I had exactly the right amount of ganache to fill these 9 cupcakes.
I used a similar base for my frosting, but this time my ratios were 225g of icing sugar, 100g of butter, and 1 tbsp of cream (but no brown sugar this time, as that would be strange with mint). I added a little bit of peppermint extract (maybe 1/8tsp, I really just wanted a hint, as I find mint can be too overpowering if not used sparingly) and one drop of AmeriColor avocado food gel to give it the slightest green tint.
I used another jumbo star tip, this one slightly closed and with fewer points (I think this is pretty close to the piping tip I’ve used for making a rose swirl on cupcakes). I found the same trick worked to make this icing look nice, squeezing a good blob in the centre then moving in a circle around the top of the cupcake.
To finish, I chopped up a mint Aero bar and sprinkled the crumbs on top. I also made some chocolate shards, just by melting and spreading chocolate into a thin rectangle, then breaking up the pieces. I spread some of my chocolate onto a cocoa transfer that my mom bought me ages ago; the transfer sheet has a mix of green and white flowers, so I thought it would match really nicely with the green and brown I already had on the cupcake. I put one coloured shard, and one plain shard, on top of each cupcake. I tried my best to get nice pointy shards on top, as I like the spiky look.

I’m hard pressed to say which of these is my favourite, though I’m leaning toward the chocolate chip cookie ones, because I little more planning went into those. The mint cupcakes really didn’t come together until I started to make them and realized I’d need something a little more exciting.
I’ve tested all of the components individually (really, the best part of the baking process) and I can definitely say they are all delicious on their own, so I really hope these go over well with my kids in class!

